
Description
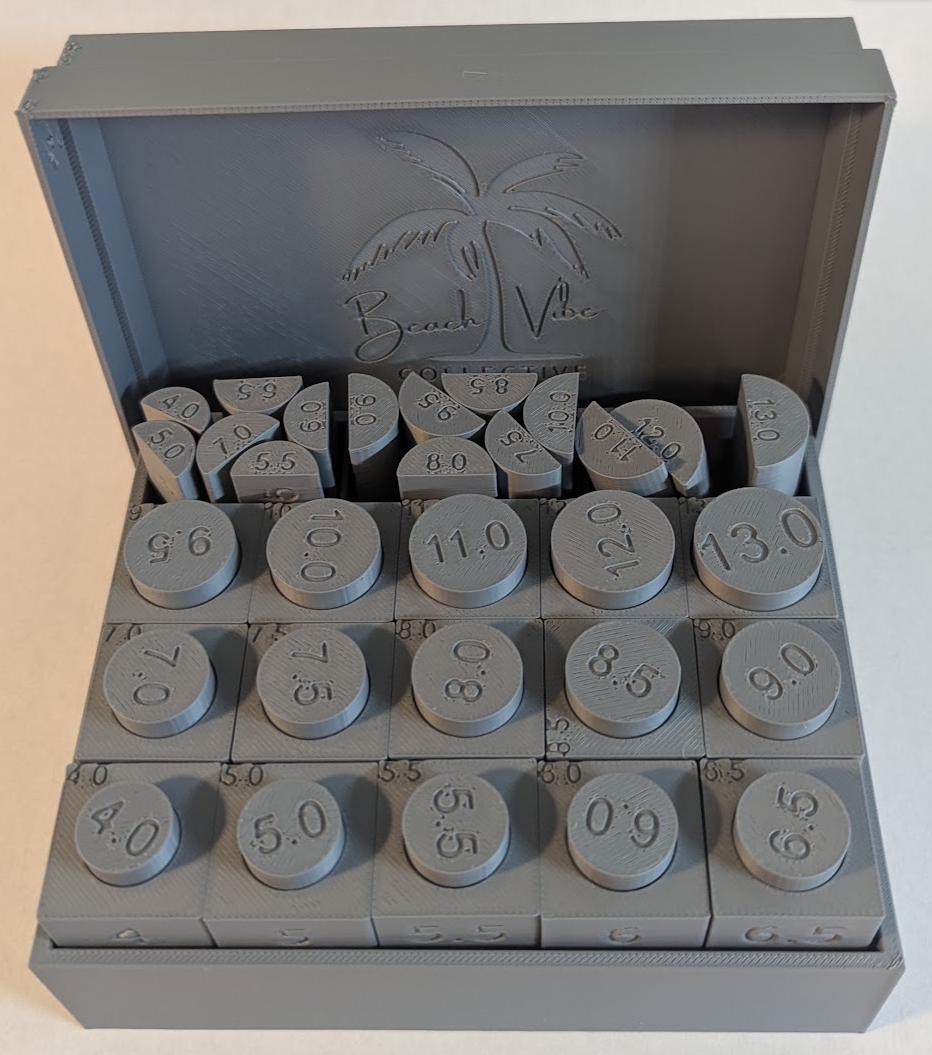
Make custom ring casting easier with this complete set of reusable ring casting cores.
Designed for use with Delft clay and other sand-casting methods, this kit provides the plastic core components needed to create ring-shaped cavities for casting. Simply select the desired ring size and use the core to form the ring’s interior during mold preparation.
The kit includes 15 US ring sizes:
4, 5, 5.5, 6, 6.5, 7, 7.5, 8, 8.5, 9, 9.5, 10, 11, 12, and 13.
All cores are neatly organized in a compact storage case, making it easy to find the size you need and keep your tools organized.
An excellent addition to any jewelry maker’s casting setup, whether you’re making custom rings, one-of-a-kind designs, or repeatable castings in a range of sizes.
Instructions for Use
This kit allows you to create sand-casting molds for rings in 15 different US sizes. Follow these steps to prepare your mold for casting.
Step 1 – Select Your Ring Size
Choose the half-round plastic cylinder corresponding to the desired US ring size.
Step 2 – Create the Initial Impression
Place the half-round cylinder flat-side down. Center the male half of the casting mold around it. Pack casting sand firmly into the mold and level the surface.
Step 3 – Remove the Half-Round Cylinder
Turn the mold over and carefully remove the plastic half-round cylinder. This leaves a semicircular impression in the sand.
Step 4 – Position the Master Ring
Create a solid cylinder of sand by packing sand into one of the hollow molds. Place your master ring on this sand cylinder.
Position the master ring and sand cylinder over the impression from Step 3. Press the master ring into the sand, using the impression to guide and position it.
Step 5 – Complete the Second Half of the Mold
Place the female half of the casting mold onto the male half. Pack the female half firmly with casting sand and level the surface.
Step 6 – Cut the Sprue and Air Vents
Carefully separate the two mold halves. Remove the master ring pattern and prepare the mold for casting by cutting a sprue (pouring channel) and adding small air vents to allow gases to escape.
Step 7 – Install the Sand Core
Create a solid cylinder of compacted sand by packing sand into one of the hollow molds. This sand cylinder replaces the original plastic half-round cylinder and forms the inside of the finished ring.
Step 8 – Assemble and Cast
Carefully put the two mold halves back together with the sand core properly positioned. The mold is now ready for casting.
Pour your molten metal through the sprue using appropriate jewelry sand-casting procedures.
Step 9 – Finish Your Ring
Once the metal has cooled sufficiently, open the mold and remove your casting. Cut away the sprue, clean up the casting, and finish your ring.
Casting Tip: Take care when separating and reassembling the mold halves. Keeping the sand impressions and core intact is important for producing a clean, accurately shaped casting.
Reviews
There are no reviews yet.